Enterprise Azure Terraform Lab Phase 1.5 Part 2 : Private Endpoint and Defender for Cloud Demo
📁 GitHub Repository: lwc-wk/enterprise-azure-lab1
Enterprise Azure Terraform Lab Phase 1.5 Part 2 : Private Endpoint and Defender for Cloud Demo
🧩 Background
The first part of Phase 1.5 focused on low-cost security hardening:
- Storage Account secure configuration
- App Service HTTPS / TLS / FTPS settings
- Managed Identity
- Key Vault baseline
- Diagnostic settings
- Custom Azure Policy audit
- Incident response documentation
This part moves into optional production-style demonstrations.
These controls are useful, but they are not part of the default low-cost deployment.
The two main demos are:
- Key Vault Private Endpoint
- Microsoft Defender for Cloud paid-plan awareness
The goal is not to keep everything enabled permanently.
The goal is to prove that I understand how these production security controls work, how they affect architecture, and why cost control matters.
Default Phase 1.5 baseline = low-cost security hardening
Optional Phase 1.5 demos   = production-style evidence screenshots
🔐 Why Key Vault Private Endpoint?
Key Vault stores secrets, keys, and certificates.
Even when authentication and RBAC are configured correctly, the Key Vault service still normally exposes a public service endpoint.
A Private Endpoint changes that network pattern.
Instead of relying only on the public endpoint, Key Vault receives a private IP address inside the virtual network.
Conceptually:
Before:
Workload / user
→ Public endpoint
→ Key Vault

After:
Workload
→ Virtual Network
→ Private Endpoint private IP
→ Key Vault
This is a production-grade pattern for reducing public exposure of Azure PaaS services.
For this lab, Key Vault is the best Private Endpoint target because it already exists in Phase 1.5 and the security story is clear.
🌐 Creating the Key Vault Private Endpoint
The demo starts from the Key Vault networking page.
Before the Private Endpoint is created, there are no private endpoint connections.
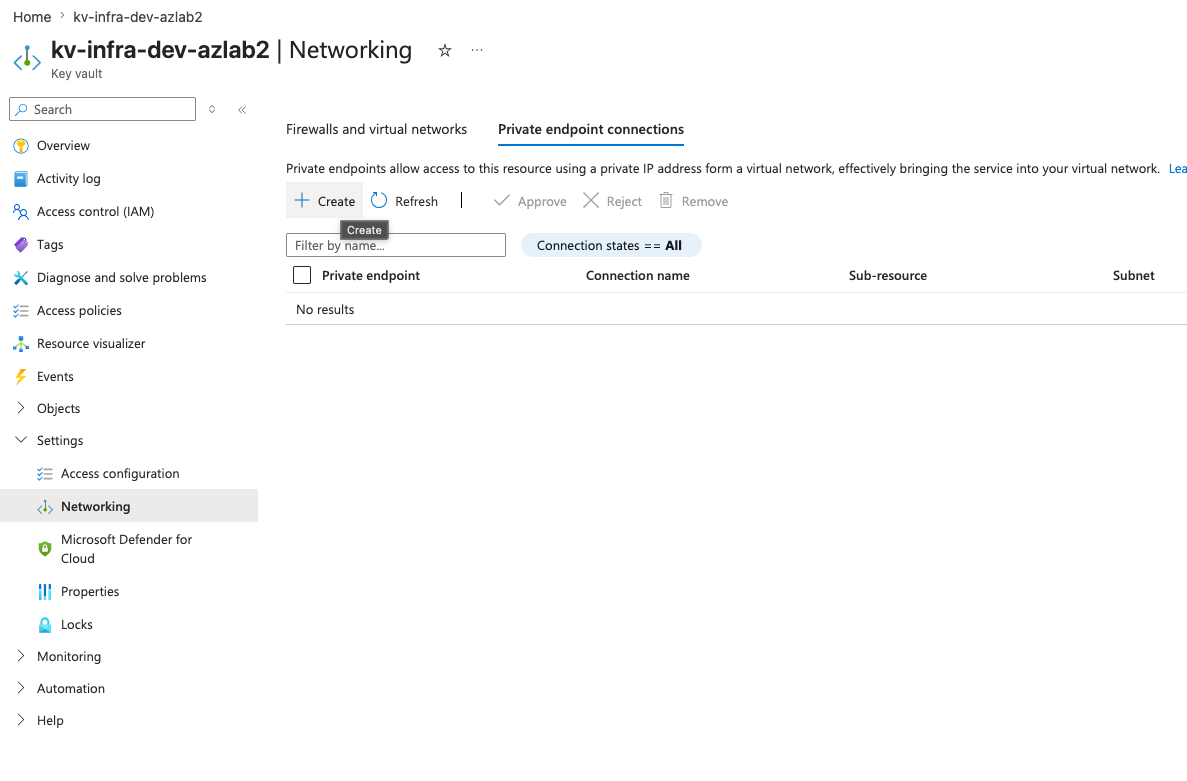
From the Key Vault networking page, I selected Create under private endpoint connections.
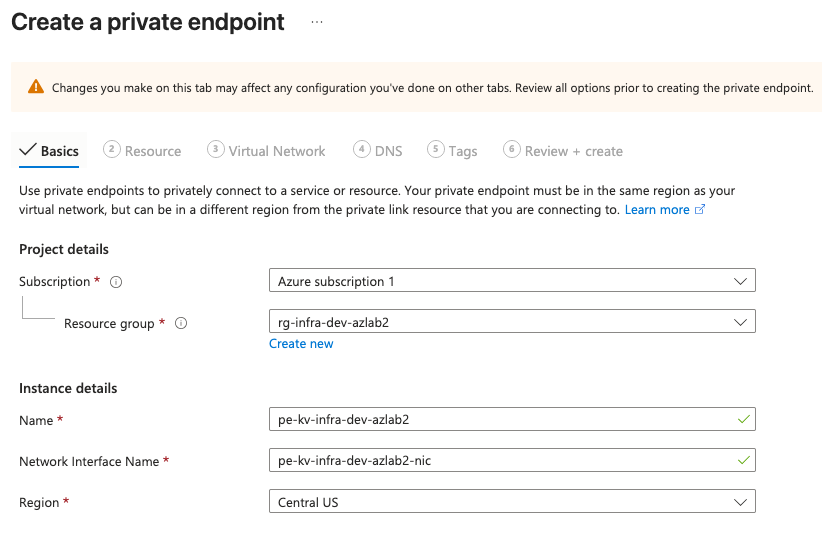
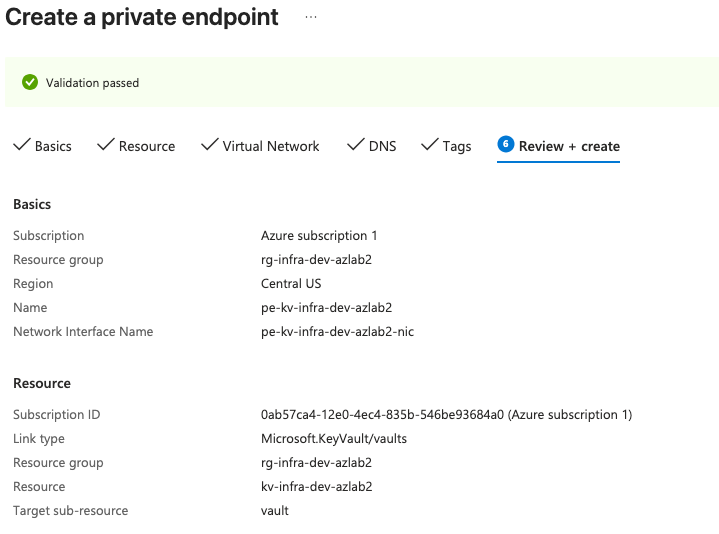
The basics page defines the private endpoint name, network interface name, resource group, and region.
In this lab:
Private Endpoint name: pe-kv-infra-dev-azlab2
Network interface:    pe-kv-infra-dev-azlab2-nic
Region:               Central US
Resource Group:       rg-infra-dev-azlab2
The resource page connects the Private Endpoint to the Key Vault resource.
The selected resource type is:
Microsoft.KeyVault/vaults
The selected target sub-resource is:
vault
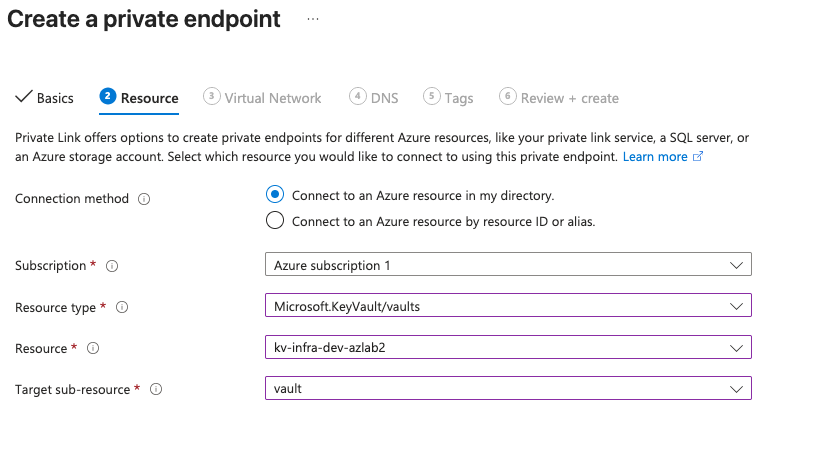
This means the Private Endpoint is specifically connected to the Key Vault vault endpoint.
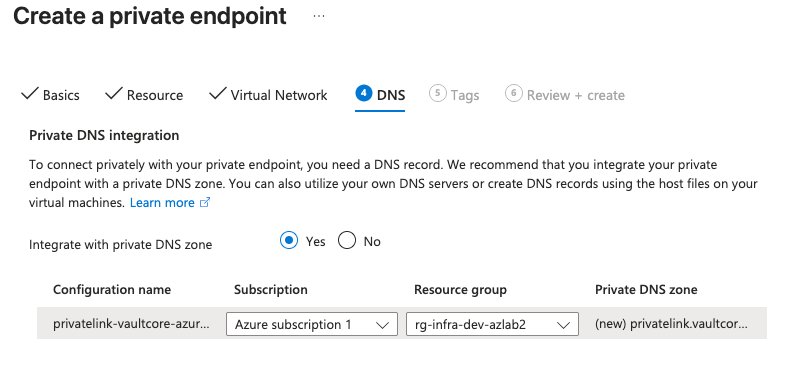
🧭 Private DNS Integration
Private Endpoint is not only about creating a network interface.
DNS is the part that makes the private access path usable.
For Key Vault, the private DNS zone is:
privatelink.vaultcore.azure.net
During the demo, private DNS integration was enabled.
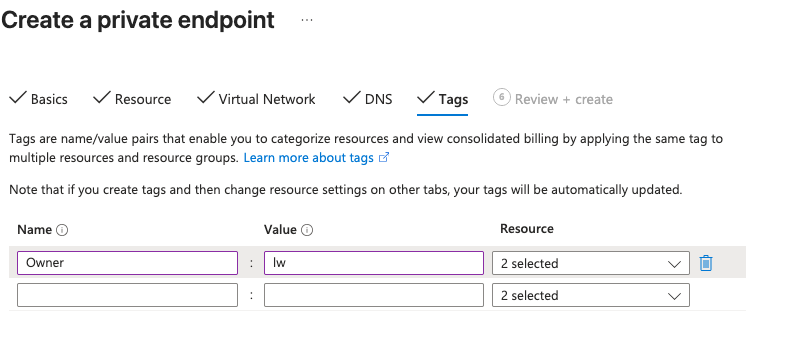
Tags were also applied to keep the resource aligned with the lab governance model.
The review page confirmed that validation passed before creation.
✅ Private Endpoint Validation
After deployment, the Key Vault networking page shows that the Private Endpoint connection was created successfully.
Private Endpoint: pe-kv-infra-dev-azlab2
Sub-resource:     vault
Subnet:           subnet-management
Connection state: Approved
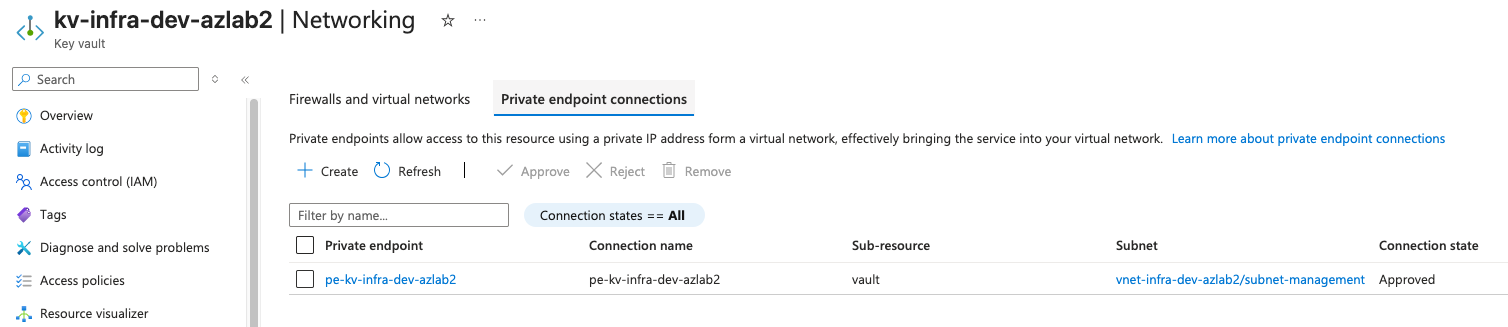
This screenshot proves that the Key Vault now has an approved Private Endpoint connection.
The Private Endpoint was placed in the management subnet:
vnet-infra-dev-azlab2/subnet-management
This matches the lab design because Key Vault is part of the security and management layer, not the public application layer.
At this point, the demo proves the private access path exists:
Virtual Network
→ subnet-management
→ Key Vault Private Endpoint
→ Key Vault vault sub-resource
Another networking view shows an important warning:
Firewall settings allow access from all networks.
The security provided by private endpoints will not be satisfied.
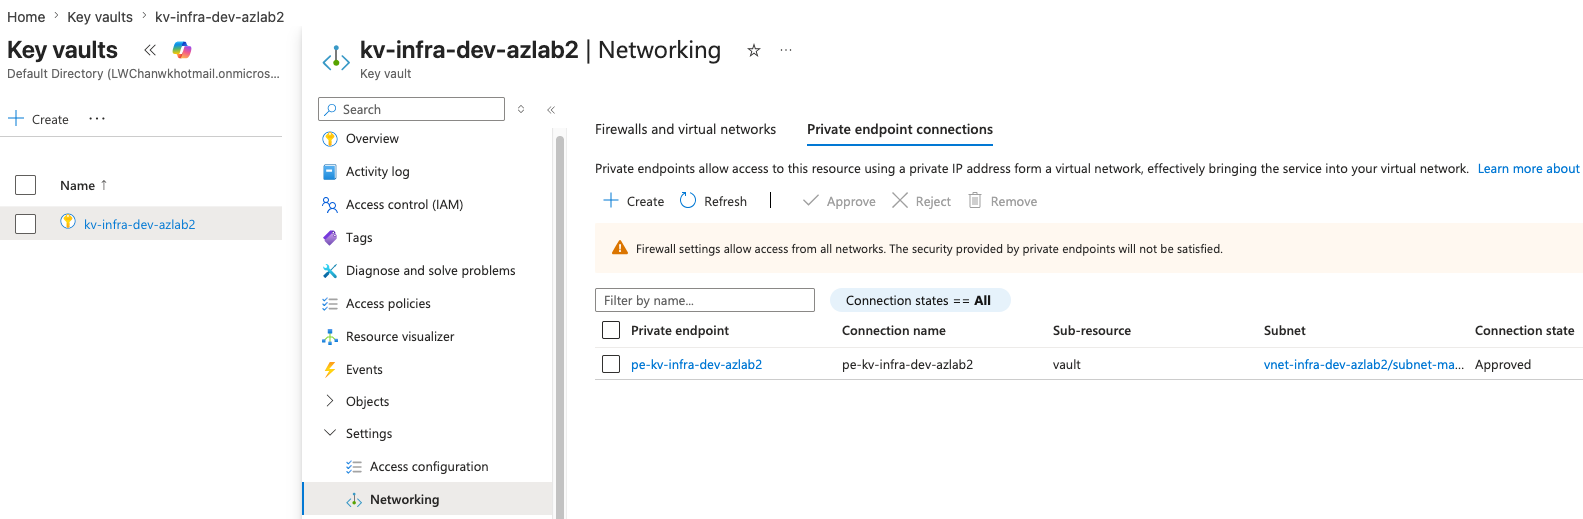
This warning does not mean the Private Endpoint failed.
It means the Key Vault still allows public network access.
So the correct interpretation is:
Private Endpoint connection exists: Yes
Private DNS integration exists: Yes
Private-only access enforced: No
That distinction matters.
Creating a Private Endpoint gives the Key Vault a private access path, but it does not automatically make the Key Vault private-only. To make the design stricter, public network access would need to be restricted after private DNS and private connectivity are validated.
For this lab, I intentionally stopped at the Private Endpoint validation stage because the goal was a one-time production-style screenshot demo, not a full private networking lockdown.
In production, the next hardening sequence would be:
Create Private Endpoint
Validate Private DNS resolution
Validate private connectivity from the workload
Restrict or disable public network access
Monitor access through logs
This makes the demo honest: it proves that Key Vault Private Endpoint was configured, while clearly documenting that full public-access lockdown is a future production hardening step.
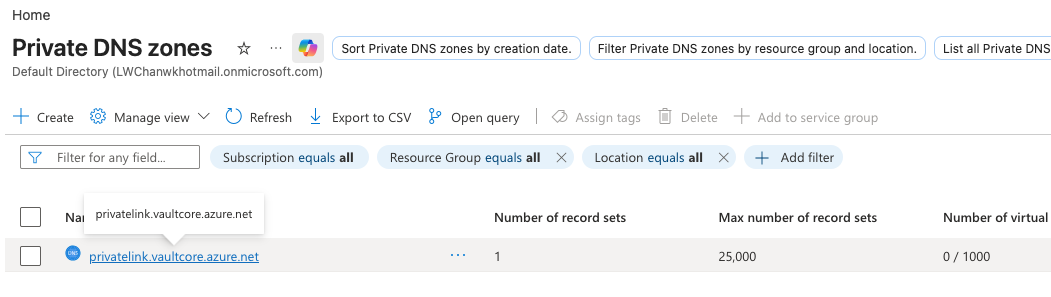
🧩 Private DNS Zone Evidence
The Private DNS zone was created as part of the Private Endpoint integration.
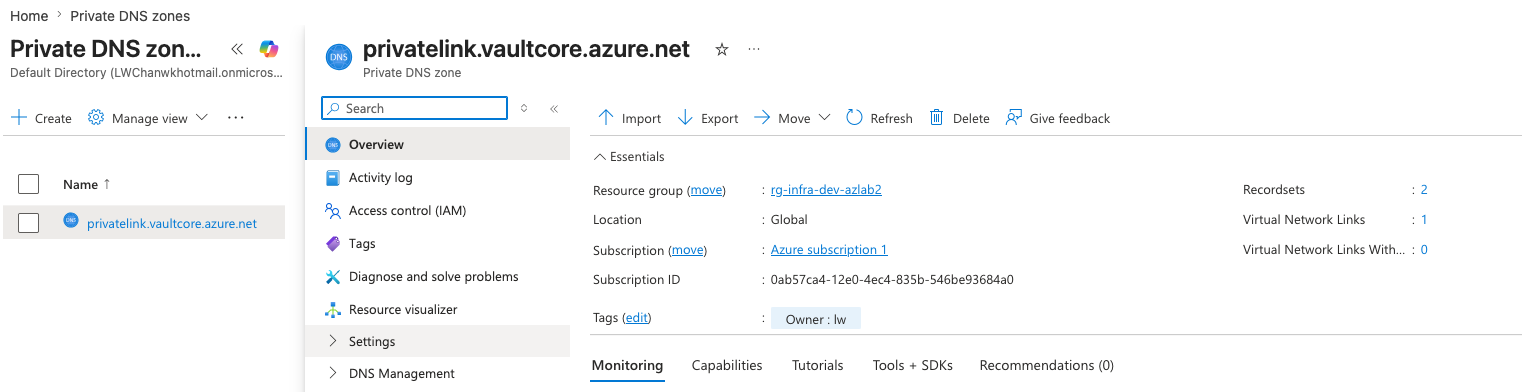
The zone overview shows:
Private DNS zone: privatelink.vaultcore.azure.net
Resource group:   rg-infra-dev-azlab2
Recordsets:       2
Virtual network links: 1
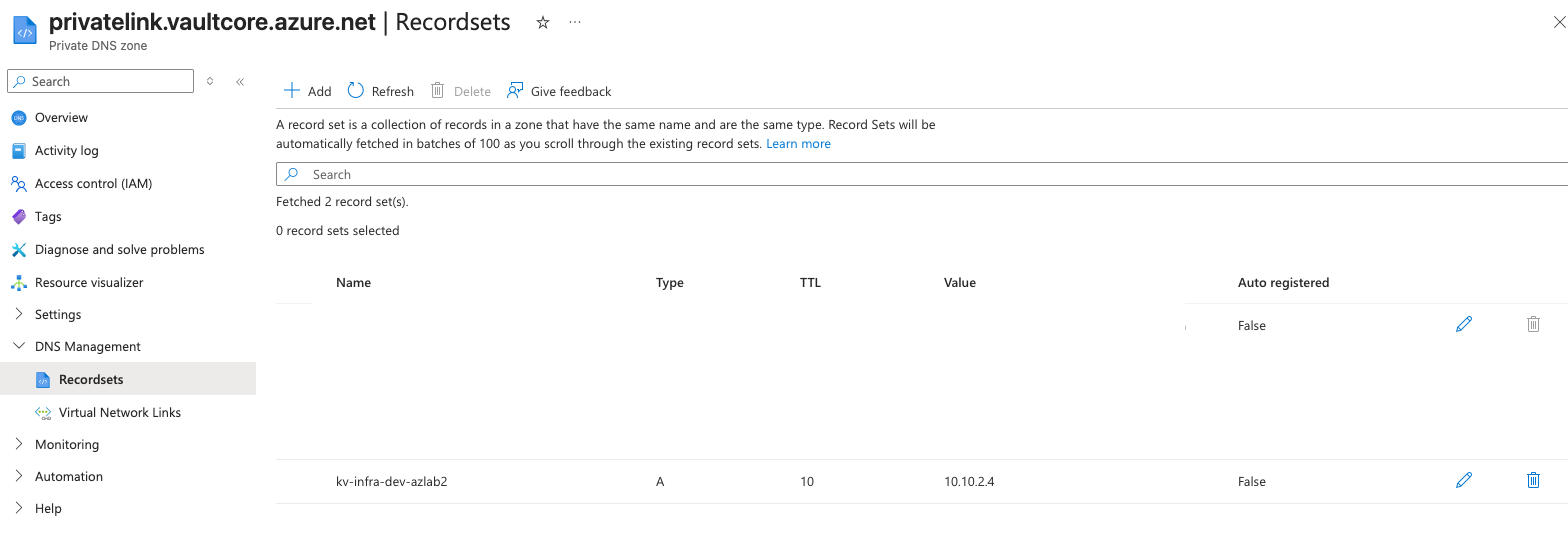
The record set confirms that the Key Vault name resolves to a private IP address:
kv-infra-dev-azlab2 → 10.10.2.4
The virtual network link confirms that the Private DNS zone is linked to the lab VNet.
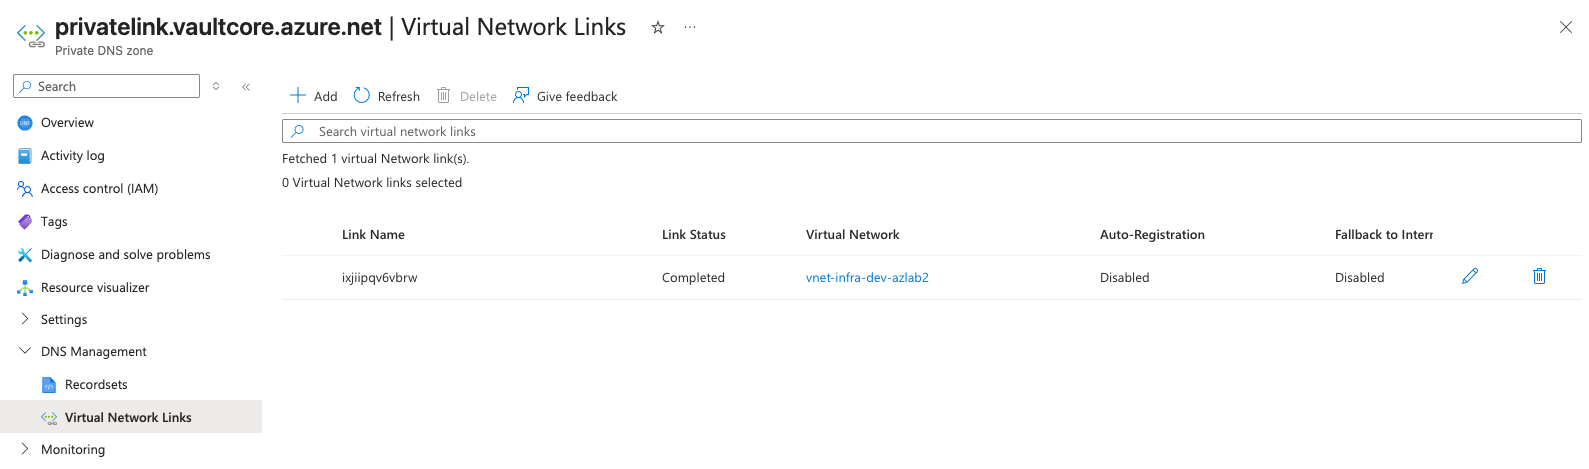
This is the key DNS relationship:
privatelink.vaultcore.azure.net
→ linked to vnet-infra-dev-azlab2
→ Key Vault A record resolves to 10.10.2.4
Without this DNS link, a workload inside the VNet may not resolve the Key Vault hostname to the private endpoint IP.
🧪 CLI Validation
The Portal evidence is useful, but I also validated the Private Endpoint configuration using Azure CLI.
List private endpoints:
az network private-endpoint list \
  --resource-group rg-infra-dev-azlab2 \
  --output table
The result shows the Private Endpoint was successfully provisioned.

List private DNS zones:
az network private-dns zone list \
  --resource-group rg-infra-dev-azlab2 \
  --output table
The result shows the private DNS zone:
privatelink.vaultcore.azure.net

List Key Vault private DNS A records:
az network private-dns record-set a list \
  --resource-group rg-infra-dev-azlab2 \
  --zone-name privatelink.vaultcore.azure.net \
  --output table
The result shows the Key Vault A record created by the private endpoint.

This validates the three core pieces:
Private Endpoint exists
Private DNS zone exists
Key Vault A record exists
⚠️ Why This Is Optional
Private Endpoint is valuable, but it is not free architecture.
It introduces:
- Additional Azure resources
- Private DNS complexity
- Networking troubleshooting
- Potential hourly and data-processing charges
- More cleanup responsibility
That is why this is treated as a one-time screenshot demo.
It is not part of the default Phase 1.5 deployment.
Default lab:
Low-cost security baseline
Optional demo:
Production-style private access pattern
This is the balance I want to show: I understand production security patterns, but I do not blindly enable cost-generating services in a temporary lab.
🛡️ Microsoft Defender for Cloud Review
The second optional demo is Microsoft Defender for Cloud.
Defender for Cloud is not just one switch.
It includes multiple areas:
- Security posture
- Recommendations
- Attack path analysis
- Security alerts
- Workload protection plans
- Environment settings
- Multi-cloud and DevOps connectors
For this lab, I used Defender for Cloud in two ways:
1. Review posture and recommendations
2. Briefly enable selected paid plans for screenshot evidence
The default lab does not permanently enable paid Defender plans.
📊 Defender for Cloud Overview
The Defender for Cloud overview page shows security posture information across subscriptions.
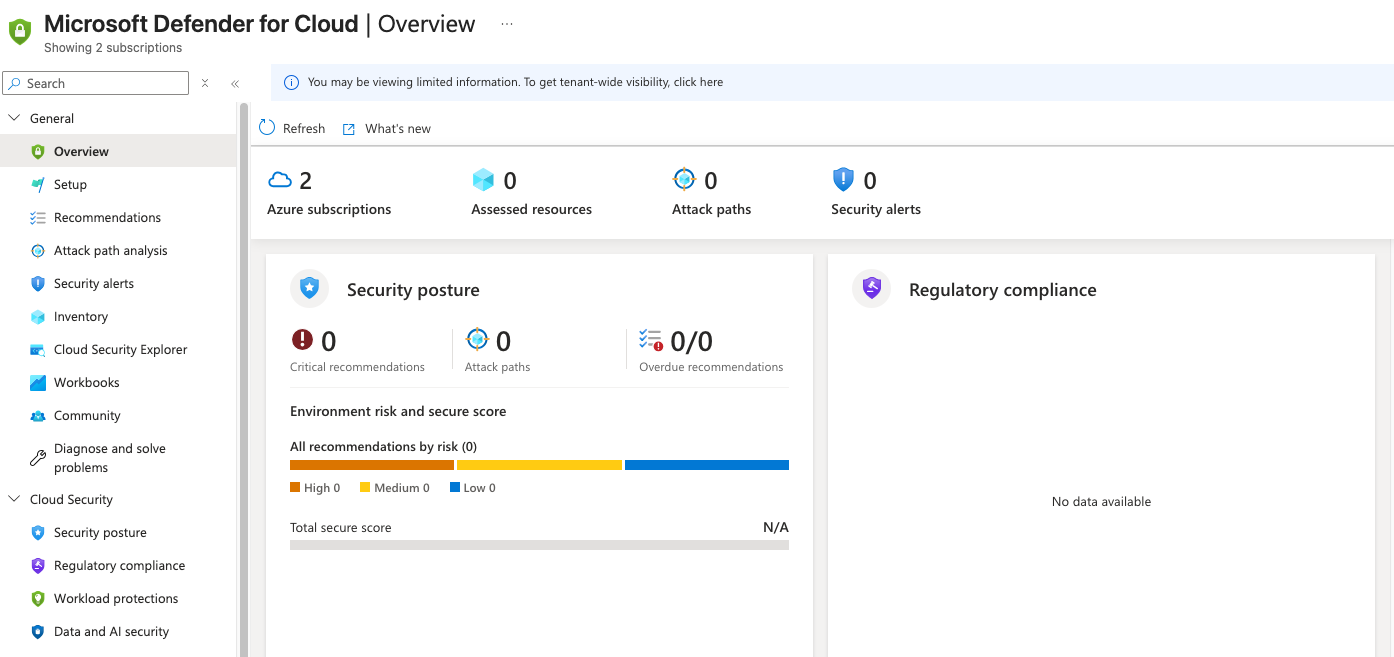
This page is useful for showing that Defender for Cloud was reviewed as part of the security posture assessment.
It also makes clear that posture review and paid workload protection are not the same thing.
📋 Defender Recommendations
The recommendations page shows security posture findings, grouped by risk level and category.
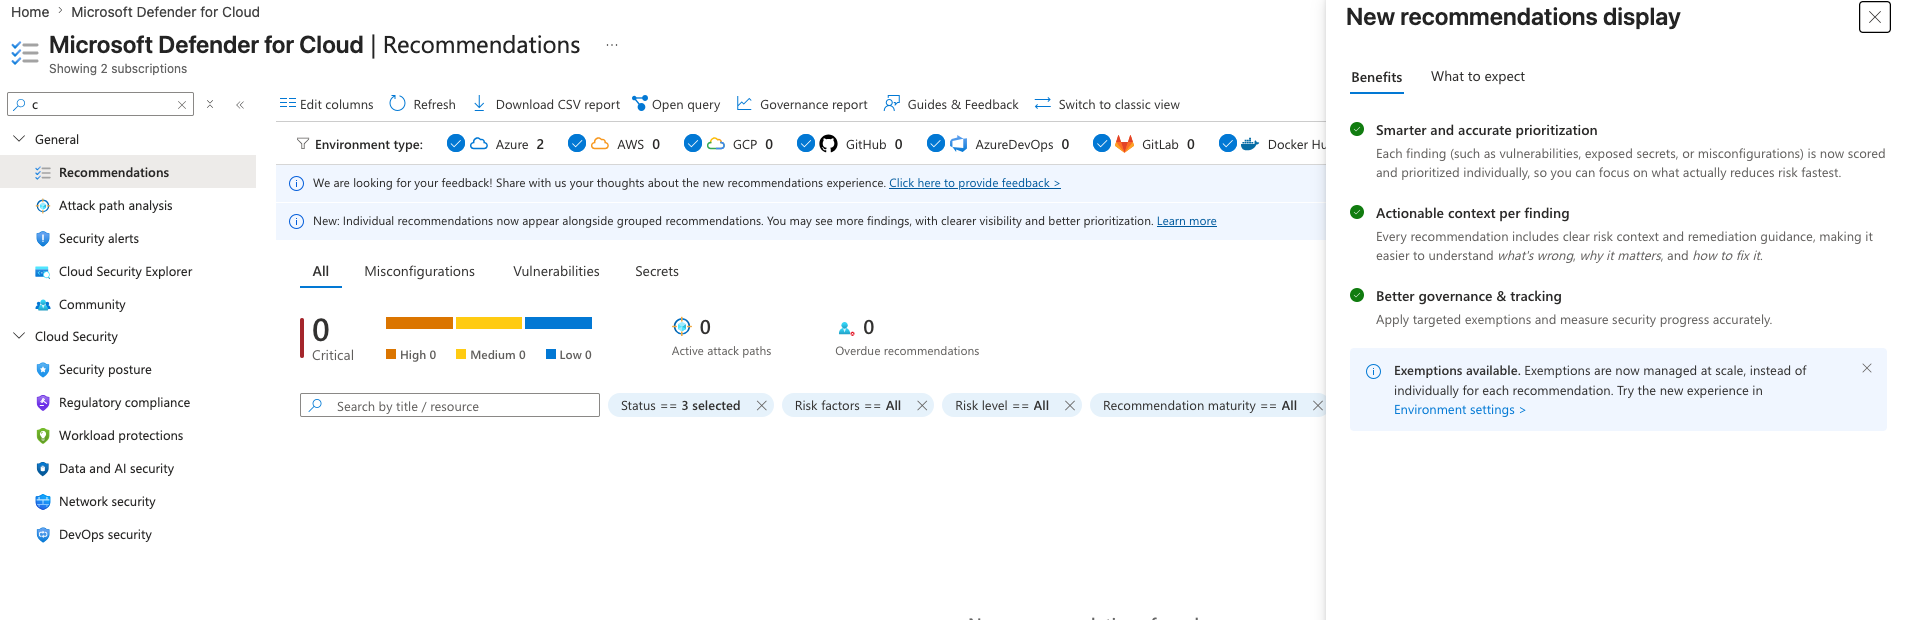
In this lab, the recommendations view shows:
Critical: 0
High: 0
Medium: 0
Low: 0
Active attack paths: 0
Overdue recommendations: 0
This is evidence that Defender for Cloud recommendations were reviewed.
It does not mean paid Defender workload protection must remain enabled.
🌍 Defender Environment Settings
The environment settings page shows the connected environments and subscription coverage.
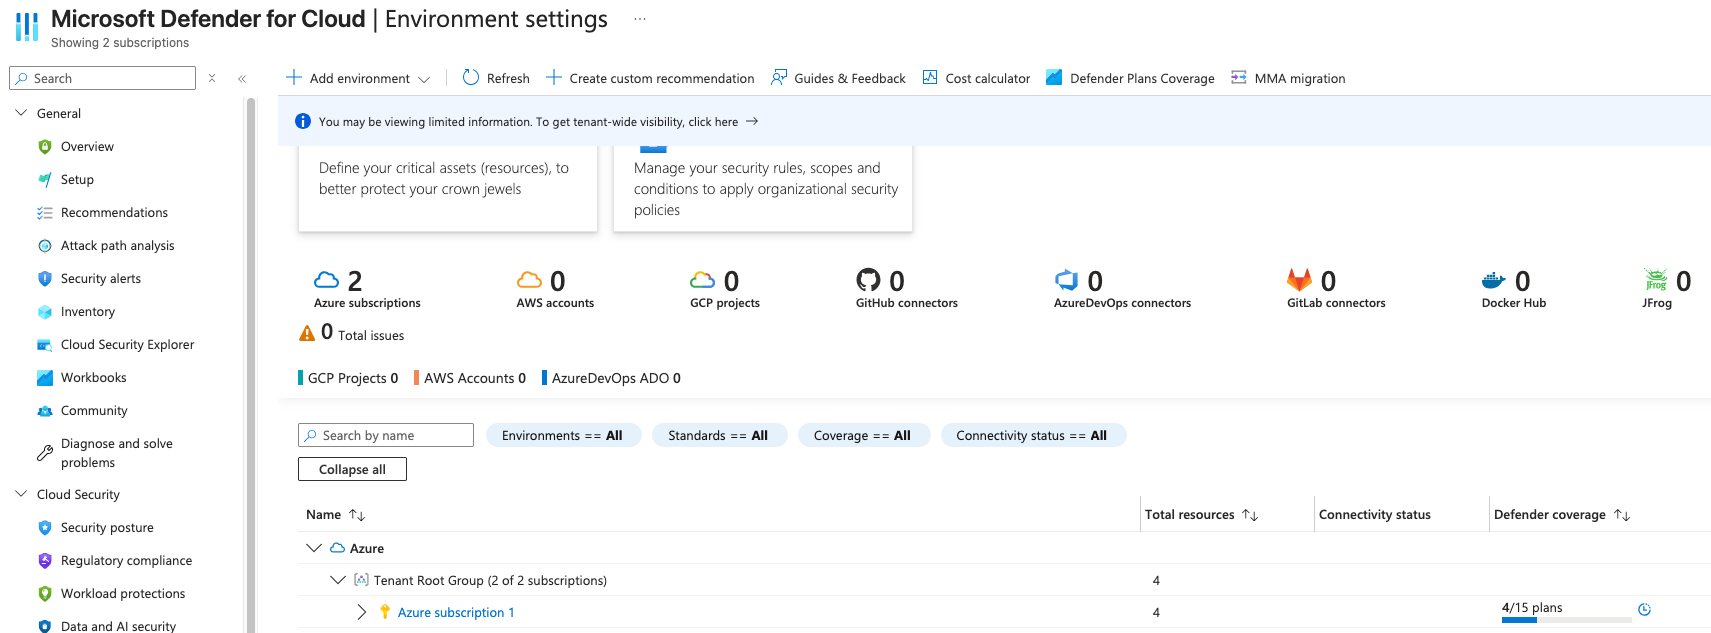
The lab is focused on Azure, but Defender for Cloud can also connect to:
- AWS
- GCP
- GitHub
- Azure DevOps
- GitLab
- Docker Hub
- JFrog
For this project, only Azure subscription evidence is relevant.
The environment view also shows Defender plan coverage for the subscription.
This is where paid workload protection plans are managed.
💰 One-Time Defender Paid Plan Demo
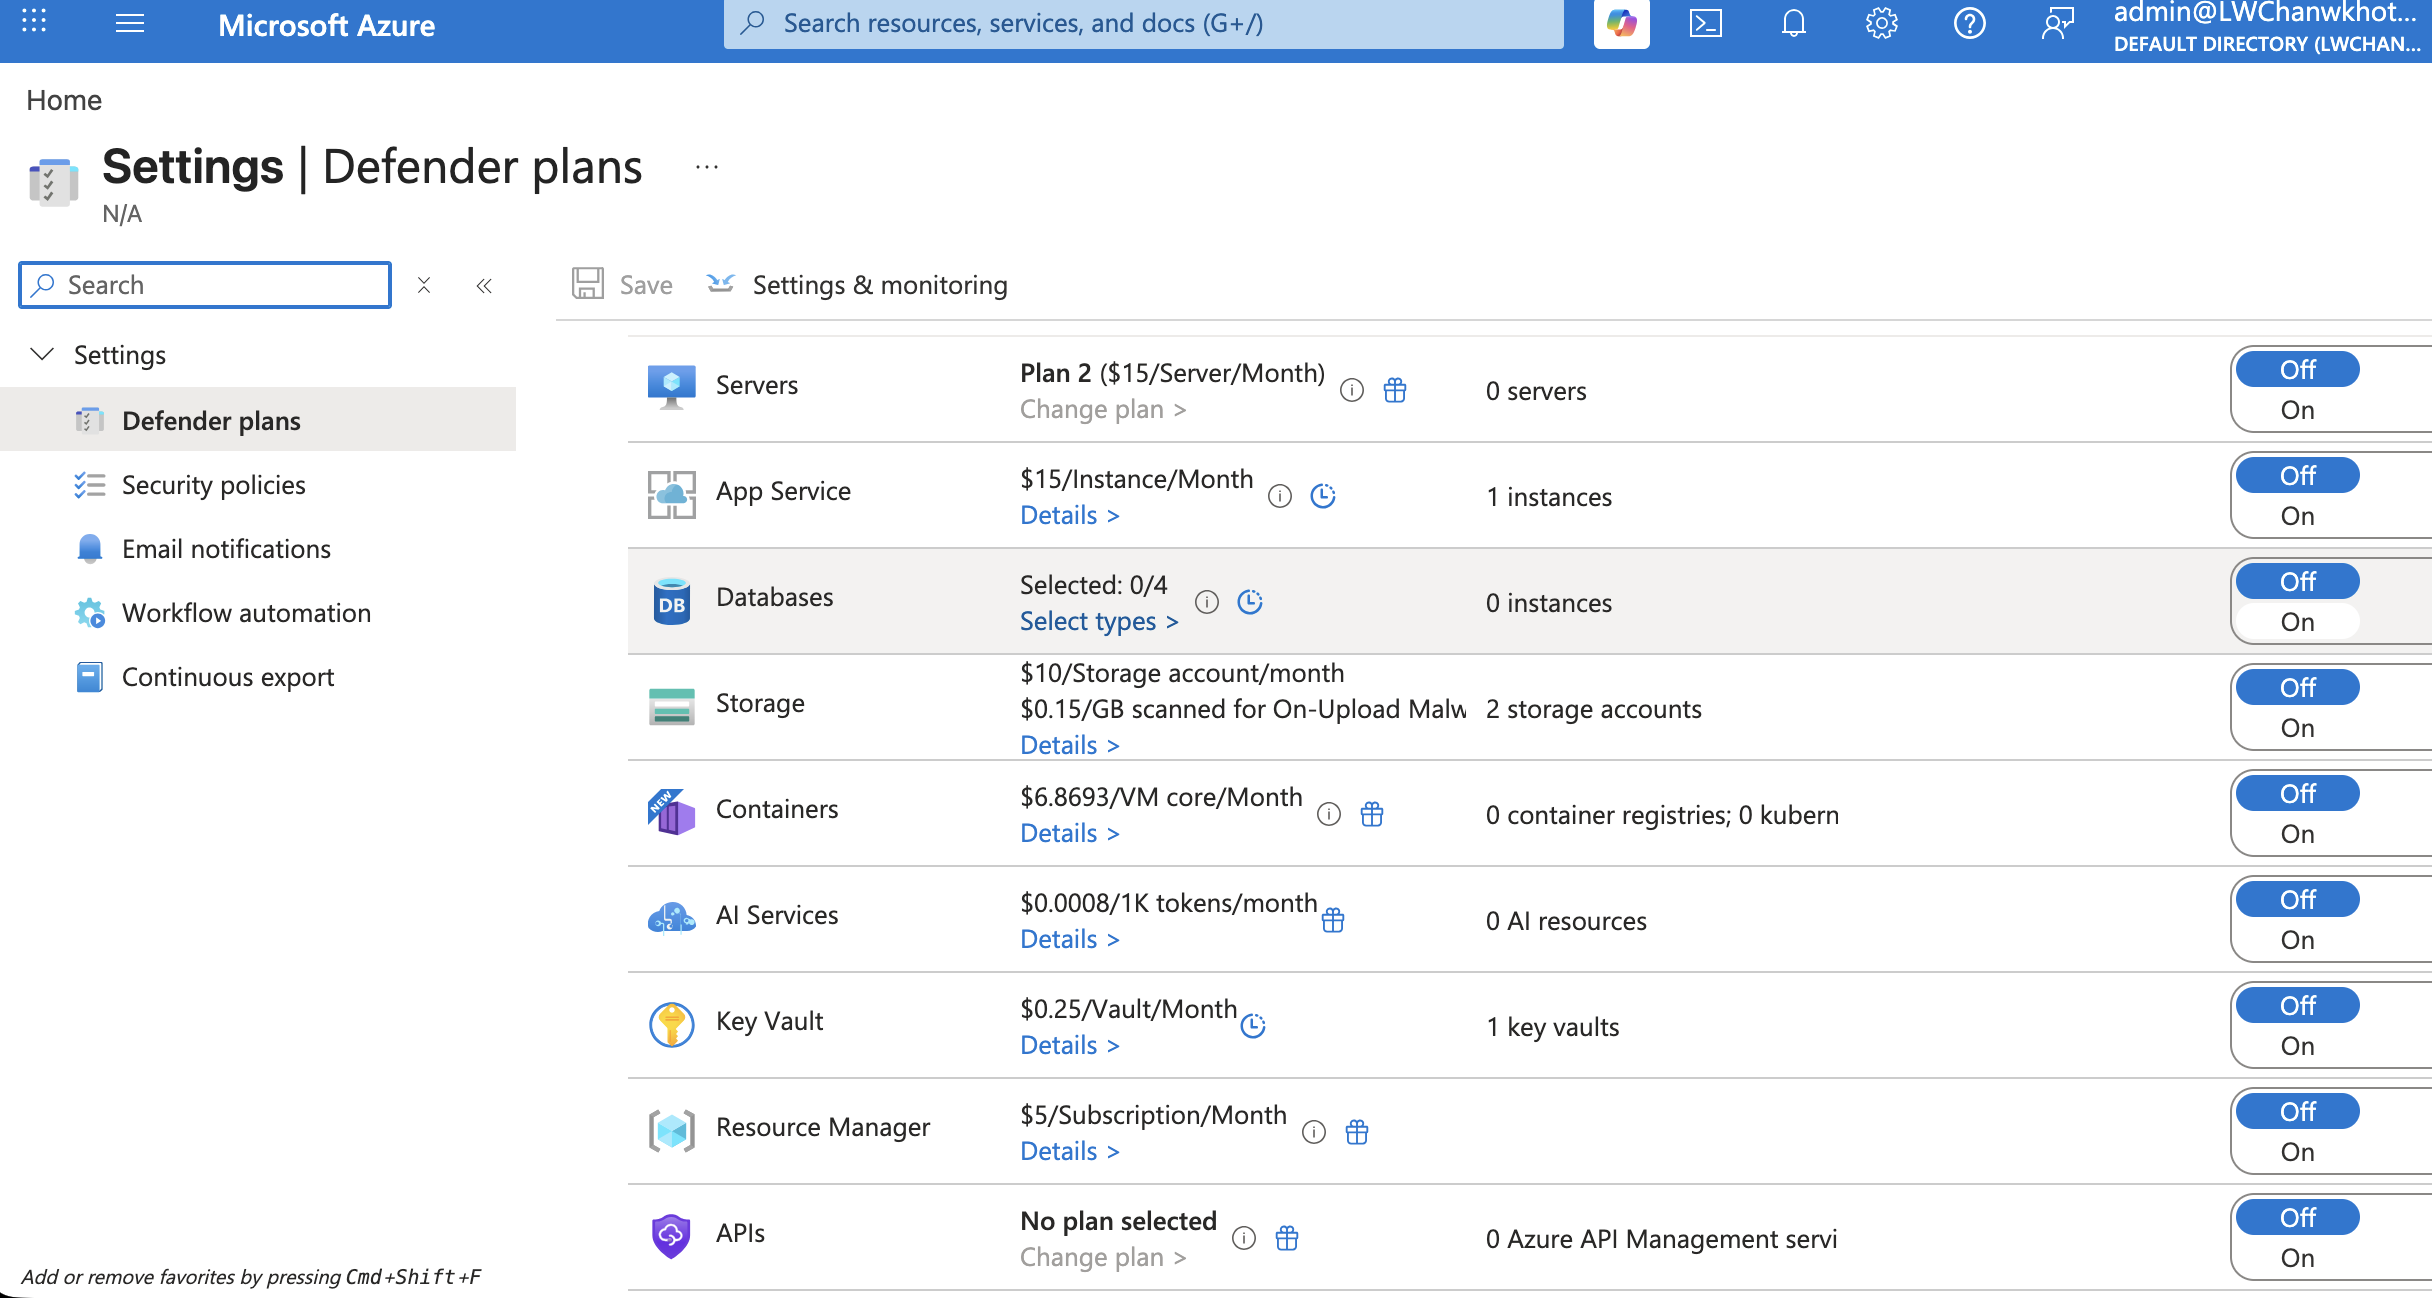
For a short demo, I enabled only the Defender plans that match the lab architecture:
- Defender for App Service
- Defender for Key Vault
These are relevant because the lab deploys:
Azure App Service
Azure Key Vault
The Defender plans page shows both plans enabled.
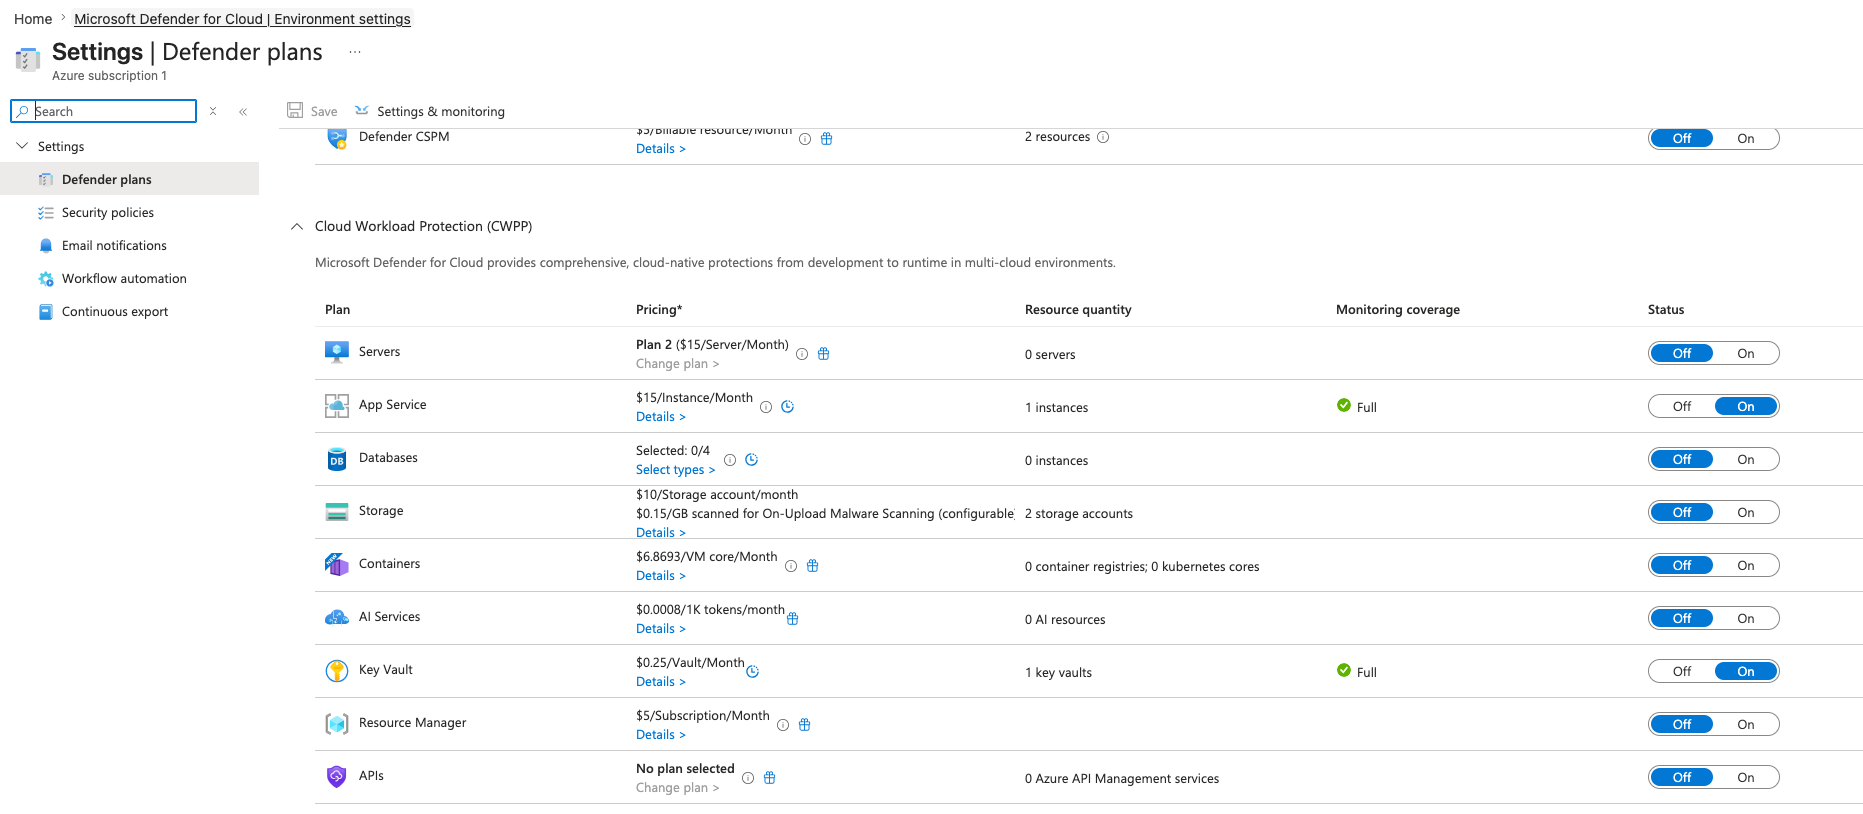
This screenshot is useful, but it should be interpreted carefully.
It is not the default state of the lab.
It is a one-time paid-plan demonstration.
The Terraform scaffold for this demo is intentionally disabled by default:
infra/defender.tf.disabled
The idea is:
Document how the plans could be enabled.
Enable them only for screenshot evidence if needed.
Disable them immediately afterward.
Example scaffold:
variable "enable_defender_paid_demo" {
  description = "Enable optional Microsoft Defender for Cloud paid-plan demo. Keep false unless doing a short screenshot-only demo."
  type        = bool
  default     = false
}

resource "azurerm_security_center_subscription_pricing" "appservices" {
  count         = var.enable_defender_paid_demo ? 1 : 0
  tier          = "Standard"
  resource_type = "AppServices"
}

resource "azurerm_security_center_subscription_pricing" "keyvaults" {
  count         = var.enable_defender_paid_demo ? 1 : 0
  tier          = "Standard"
  resource_type = "KeyVaults"
}
The default value should remain:
default = false
That keeps the lab safe by default.
🚫 What I Did Not Enable
I intentionally avoided enabling several paid or larger-scope services:
- Defender for Storage malware scanning
- Defender for Servers
- Defender for Containers
- Microsoft Sentinel
- Azure Firewall
- Web Application Firewall
This is not because those services are useless.
It is because they are outside the low-cost Phase 1.5 scope.
A good lab should show judgment.
The question is not:
How many security products can I turn on?
The better question is:
Which controls are appropriate for this lab, and what would change in production?
🧾 Summary
This part of Phase 1.5 demonstrated two optional production-style security controls.
Key Vault Private Endpoint showed how production environments can reduce public exposure for PaaS services.
The demo included:
- Private Endpoint creation
- Key Vault
vaultsub-resource selection - Private DNS integration
- Private DNS zone record validation
- VNet link validation
- CLI verification
Defender for Cloud showed security posture and workload protection awareness.
The demo included:
- Defender overview
- Recommendations review
- Environment settings review
- One-time App Service and Key Vault paid-plan evidence
- Cost-control positioning
The main lesson is:
Production security is not only about enabling controls.
It is also about knowing when a control belongs in the default deployment, when it should be optional, and when it should be documented instead of permanently enabled.
Phase 1.5 now shows both sides:
Low-cost baseline hardening
+
Optional production-grade security demonstrations
That makes the project more realistic, more interview-ready, and more honest.